Get a system setup as a gift, paying for year in advance. The promotion is valid until 2024/09/30 🎁

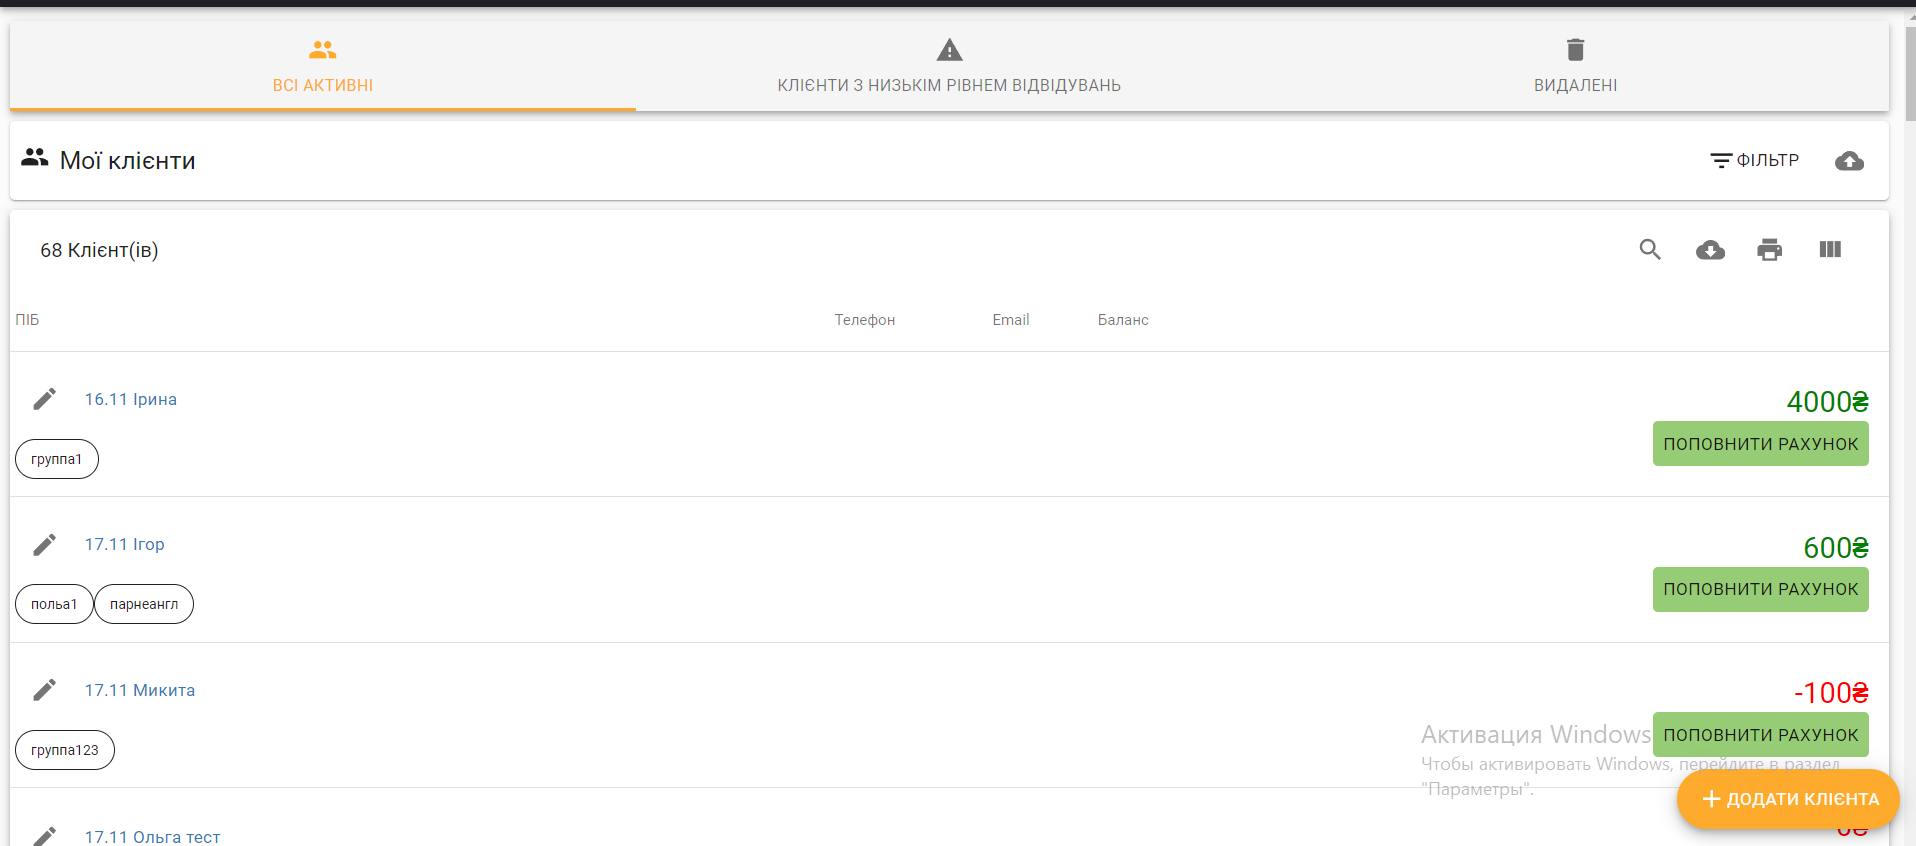
Importing customers in one click with Voopty

Earlier, we told you how to add customers to the Voopty CRM system. Let us remind you a little bit.

  1. First, you need to go to the “My clients” section
  2. At the bottom right, click the “Add customer” button
  3. Then you should fill in the customer profile with all the necessary data: Full name, avatar if necessary, phone number, e-mail, note. You should also specify the teacher and the branch to which you want to add him/her.

That’s it – the client is added to the system.

But what if you need to add all clients at once and not enter each one separately? Then in the “My clients” section, click on the “Import” button in the lower right corner. Next, you need to enter a link to an Exel spreadsheet that is hosted, for example, on Google Drive. Click Import and then enter the name, phone number, and email address. 

You can also add a tag or a note. Next, click Upload clients – Import clients. After the page refreshes, the customers are added to the Voopty CRM system. 

By the way, all this can be done from a mobile phone. Let us tell you a little bit about how the adaptive works from mobile devices. 

The Voopty sms system for a mobile phone works as perfectly as for a PC. You can immediately view the schedule for a week, day, or month using the same menu. To view it in a different way, click on the “pyramid” in the left corner and select the desired filter: teacher, classroom, canceled lessons, room colors. For teachers, there is a separate filter “Only my lessons” to see their schedule directly.

  • снятOn a mobile device, you immediately see the top bar with the necessary sections. Using it, you can go to the schedule page, see notifications, change the language, or go to your own page in the SMS system. 
  • снятIn the schedule itself, you can change the date and time of classes, cancel and add lessons, which means that the lesson can go through all the stages of editing even from your phone. It is not necessary to use the CRM system from a laptop.
  • снятTo approve a lesson change in the timetable, you just need to enter all the necessary data and click the Edit button. Then, after the timetable is updated, all changes will be displayed on the main timetable screen.
  • снятYou can also view the My Clients section from your phone. Everything is in one place – easy and clear. You can also add and delete clients, as well as enter or edit the necessary data. 
  • снятOn the client page, you can view the current schedule, add classes, and change personal information. To approve the changes, click the Save button.

To add the Vupti CRM system to your phone’s desktop, click on the import button at the bottom of the screen and then Add to desktop. Now, among other applications, you can find the Voopty SMS on your phone screen, where you can always have quick access.

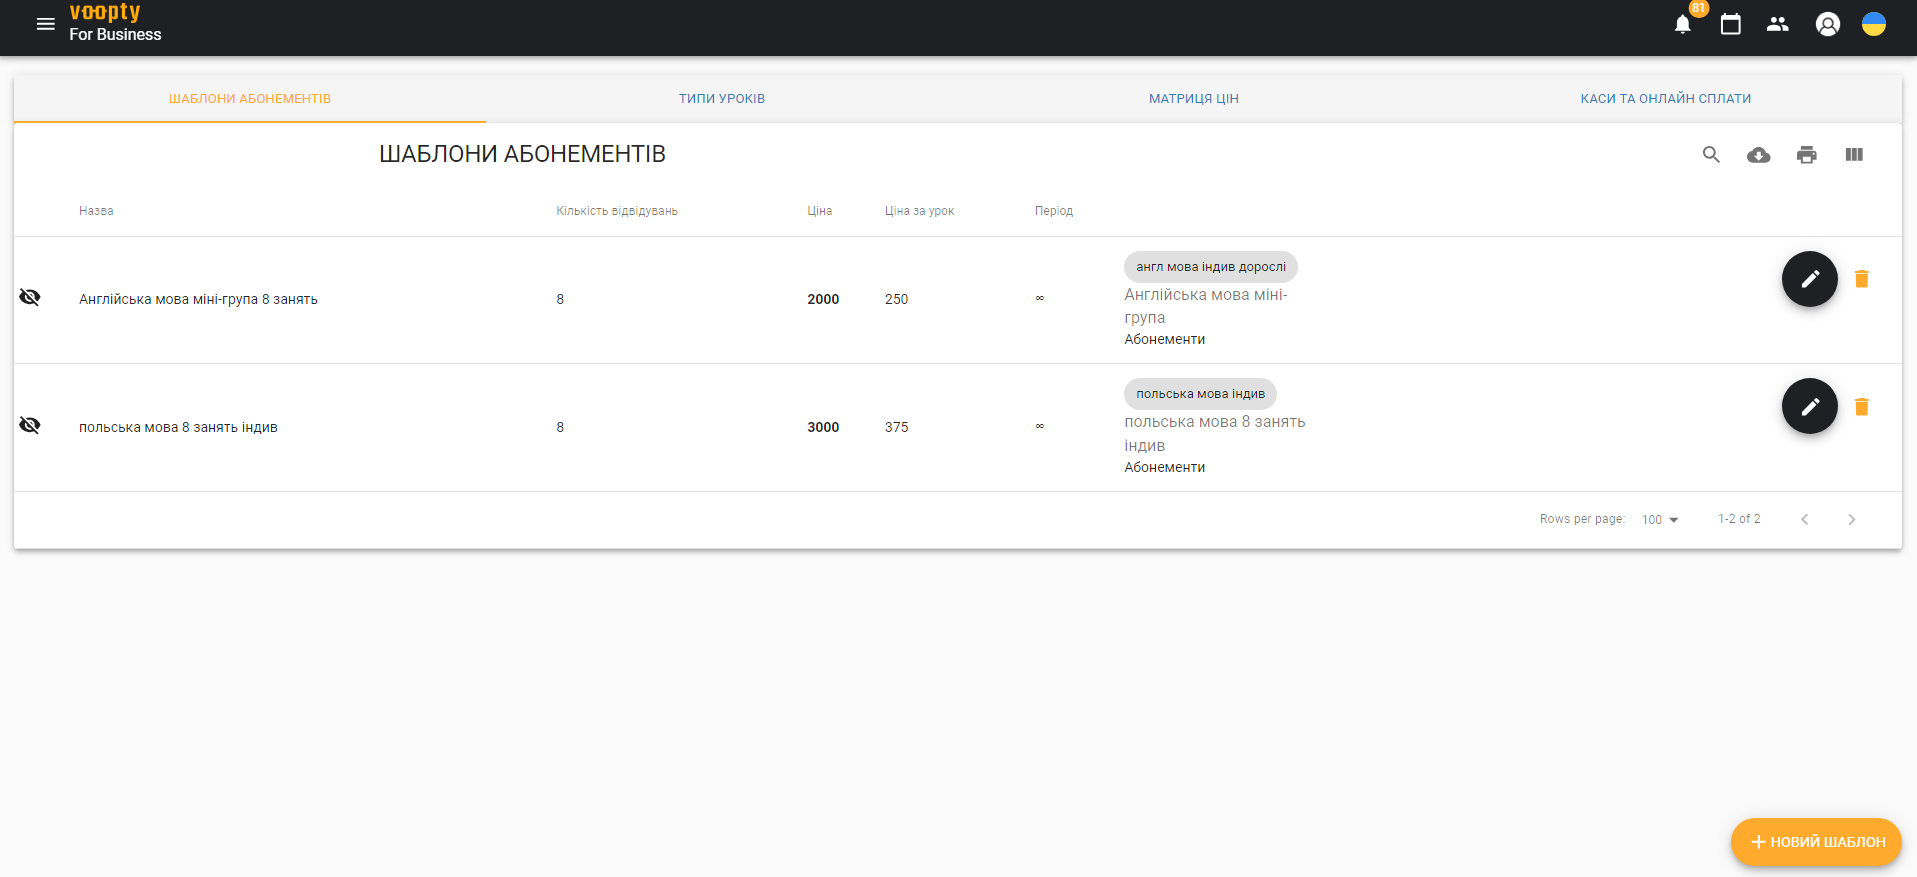
Season tickets in the Voopty CRM: how to add

Today we will show you how to set up prices and add subscription templates in the Voopty CRM system. 

  1. First, you need to go to the Pricing and subscriptions settings section. The Subscription templates page will appear on the screen. Select the New template.
  1. Enter all the necessary data: name, description. The name varies depending on the number of lessons in the subscription, for example, first we add Spanish 8 lessons, and the next subscription Spanish 16 lessons. Other subjects are also added separately. That is, the number of templates in your organization determines the number of subscriptions.
  1. Next, you can mark the subscription as FreeStyle. This means that when you sell a subscription to a specific client, you can customize it for that person. You will be able to change the duration of the subscription, the number of active classes, or the price. You can leave this option unchecked, and you won’t be able to adjust the subscription. We recommend using this function to begin with, especially when filling out the system from scratch, as there will be balances for clients.
  1.  Specify the number of visits in the subscription, select the option With or without expiration date. If you specify “With”, then select the number of periods (30 days, weeks, or months)
  1. Select the Allow overlapping memberships option in case the client will visit 2 or more memberships at the same time.

You can also add the option “Multiple customers can use”. This option is added based on the policy of your company. For example, if you can attend classes as part of a family or group of friends, then you can purchase a membership for several people. In this case, one membership will be divided between several clients. You can skip this option and not check the box next to it.

In the Cost column, you need to specify the price of the subscription for the number of lessons indicated in the name, for example, the price for 8 lessons. The system calculates the price per lesson automatically.

The next column is Works with lesson types. You need to choose what types of lessons this particular subscription works with. If the title is, for example, Spanish for Adults with 8 lessons, then select the type of lesson that logically corresponds to this subscription. Now, when a student takes this type of lesson, for example, Spanish for adults, the lesson will be deducted from this subscription. 

The last step is to save the subscription. To do this, click the button in the lower left – Save. Now a new subscription is added to the system. This way you can add all the possible season tickets that your company already has.

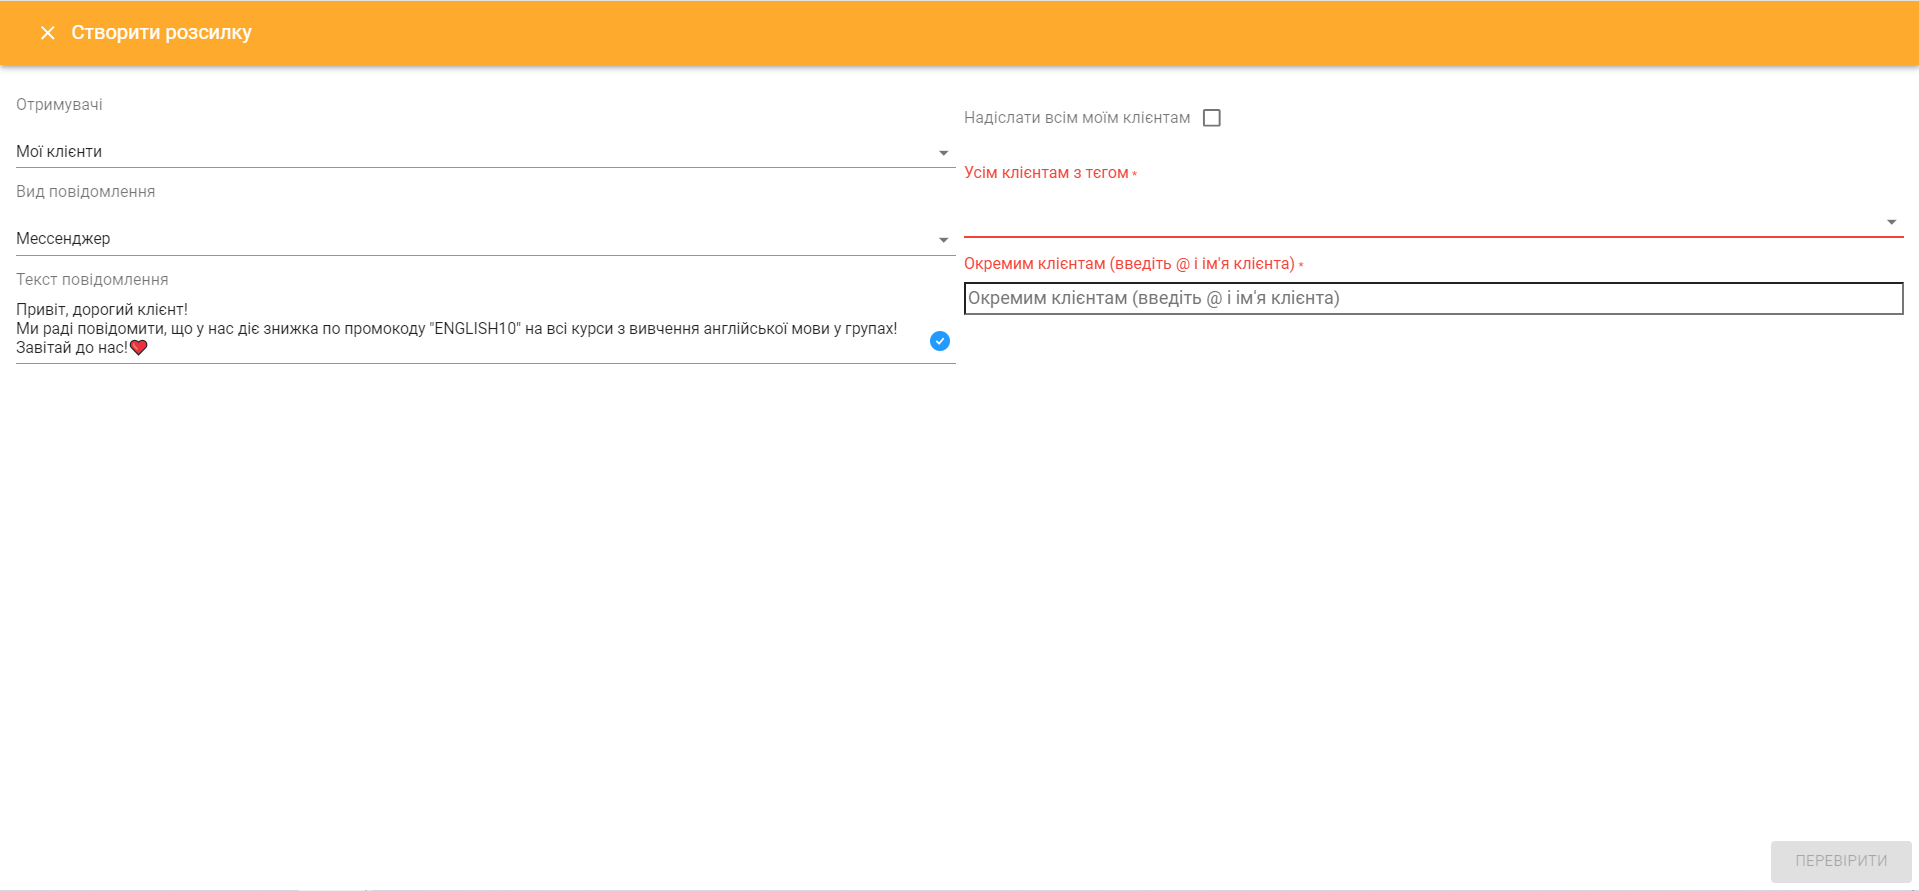
How to set up newsletters in the Voopty CRM system

Today we will discuss the section in the Voopty email marketing system called “Campaigns”. It consists of two subsections: Campaigns and Reminders.

You can send newsletters to your customers or to leads, you can send them selectively or to customers grouped by a tag.

How to do it:

  1. Click the Create a campaign button and select Recipients. You can choose, for example, My customers who are actually engaged or Customers who are attracting/receiving.
  2. If you need to send a mailing to actual customers, select My customers – Type of message (e-mail or SMS). To set up an email, you must first verify it by sending your email address to support@voopty.com or in Telegram.
  3. As soon as the email is verified, click Create Campaign, select who will be the recipient, and choose the type of message, for example, e-mail, messenger, or SMS. The Messenger message type works only if the Telegram bot is connected. Mail and messenger are free methods of sending, SMS, in turn, is paid.
  4. After selecting the type of message, the Message text box will appear where you can enter any free-form text, such as promotions, announcements about new directions in your company, etc.
  5. Once the text is typed, you can send it to all your clients, select clients by tag, or send it to individual clients. In the latter case, you need to enter the customer using the “dog”.

After that, we send the message text for verification by clicking the Verify button and that’s it – the campaign is created. 

How to set up a reminder: go to the Campaigns – Reminders section. You can set up reminders via email, Telegram bot, and Viber bot. 

  • By mail – to send email campaigns, you need to make sure that all clients have email addresses in their personal account. The mailing will be sent only to those customers whose emails are listed there.
  • If you want to send emails via Telegram bot, you need to create a bot at https://t.me/BotFather. Make sure that it is official (it has a checkmark next to it). The token should be transferred to the Voopty manager.
  • If you want to send a campaign via a Viber bot, you need to log in to the Viber Admin Panel (https://partners.viber.com/login?retu…), create a bot, and send the token to the manager.